
Note: this was actually written a few months ago. I’ve just now dug it up from my draft archives
Today, two days after starting, I finished writing my first script.
Well, it’s my first draft of a script. Which at least is more than I had two days ago. Thus the title of this post, referring to Roger Corman – perhaps most famous for filming The Little Shop of Horrors (1960) in two (2) days.
A few years ago, a co-worker and myself came up with a concept for a film. Since that time we still joked around about it. I had mentioned the idea to a couple of friends, and they’ve been telling me to “write it up.” So, I finally said the heck with it, and actually started to (paraphrasing a friend’s response to my initial draft): CREATE.
I’m a digital hoarder at heart. I’ll see an article or a post mentioning some free version of bean-counting software (or whatever), and the only thing that my brain processes is the word ‘free.’ My brain then takes control of my mouse-hand and before I can say “Wait. Do I even need this? Will I ever even use this?,” I find myself frantically searching for the download button/link. Such was the case when a friend posted a link to a free screenwriting program – a desktop version of Celtx, fully functional (apparently) except for sharing capability (side-note: that link no longer leads to the free desktop version). I quickly downloaded and installed it, then it sat on my computer for months. In the meantime, I’d finally decided to start gathering notes for “the great American screenplay.” I did that in the quickest way I knew how: creating a text file and typing random thoughts. I also mentioned to a friend what I was trying to do, and he recommended that I use that Celtx program. So, having totally forgotten that it was already installed, I immediately downloaded yet another copy of it, and while attempting to install it discovered that it was already available. Firing it up, I was faced with a program that had no standard help file or manual. However, it did have sample templates for a film, novel, audio play and other types.

Celtx Sample Film Template
I quickly scanned through the film template, and it actually seemed much simpler than I’d thought (though it didn’t cover every possibility, nor should one expect it to – such is actually part of the fun of playing with new software: discovering shortcuts, menu-options and right-clicking menus on your own). I also had a couple of scripts which my friend had sent me to proofread, so I had a rough idea of how to enter the different sections. I also started doing a little research on Wikipedia, starting with a simple search for ‘screenwriting,’ then merely following the various internal and external links to other articles and definitions.

Celtx Sample Film Template – Index Cards (Script Side)
During this stage, I took much interest in the preparation of a script, and one phrase stood out (for whatever reason): index card. The appeal no doubt being the basic premise that one jots down ideas, then moves them around – essentially creating an outline of a project. That flexibility has obvious pros and cons. Sections (scenes) can be created ‘out of sequence,’ so one can easily add a new scene. However, that also opens up the possibility of losing track of the overall story line, and creating continuity errors. Still, it’s a quick way of taking that first step: sitting down and actually writing.
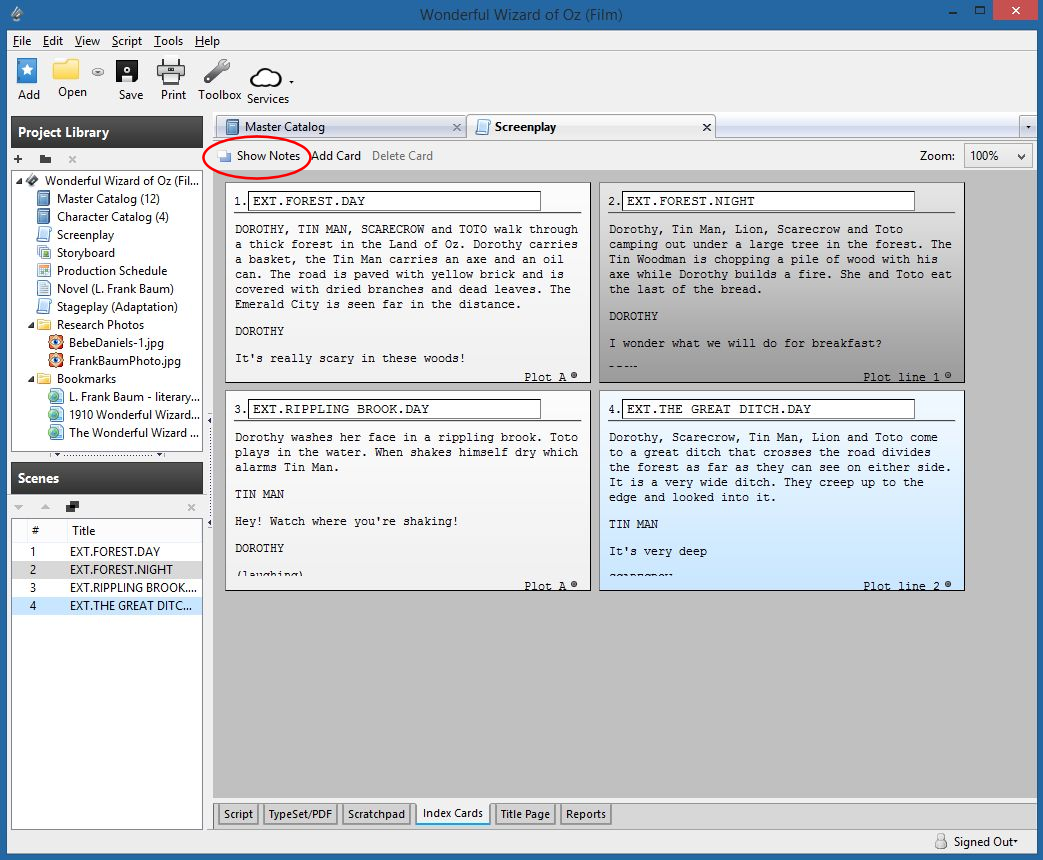
Celtx Sample Film Template – Index Cards (Script Side) – Circled tab ‘flips’ cards to Notes Side
To access the index cards (as well as the script, reports and other options) there’s a tab/menu along the bottom of the main working area. A nice thing about the index cards is that each actually generates a scene heading (discussed in a little bit) in the script (though it’s blank if you don’t actually enter anything on the index card). An added benefit (which I didn’t take advantage of, and have only played with a bit so I really don’t know how it might function) is that you can view either side of the cards, with the opposite side allowing for notes. This could be useful, but as I say I haven’t done anything with that option.
I should point out at this stage that I am only now resuming this particular post, and my script has undergone several rewrites. I’ve also learned a few other tricks about using Celtx. Still, I’m trying to recall my early experience with it, and will provide such additional information and notes later in this post.
So, now I actually had something to work with: a basic plot and a rough sequence of the various scenes within the film itself. I now started actually writing. It was during this stage that I learned a little bit about the different sections of a script (though I may have misused some of them, not having experience along these lines). First, in order to work on your masterpiece, you should select the “Script” tab in the tab/menu near the bottom of the working area.

Celtx Sample Film Template – Section Select Pull-Down Menu circled
Next, you will be selecting the various sections; either using a pull-down menu near the upper-left corner of the working area, or by using shortcut keys which Celtx will display to the right of the tab/menu bar. Those shortcut keys will actually change, depending on what type of section your cursor is currently located on. The choices are:
- Scene Heading
- Action
- Character
- Dialog
- Parenthetical
- Transition
- Shot
- Text

Celtx Sample Film Template – Scene Heading(s) circled
The first section I’ll cover is the scene heading (which had been generated by the index cards). This appears to actually be called either a screenplay slug line, or a master scene heading. As I mentioned, if you haven’t entered such a heading on the cards, this field will be blank in the script. However, the program does track each card scene sequentially in the lower-left part of the window (surprisingly called ‘Scenes’). Each is assigned a number which assists in referencing a section of the script. Note that the sequence is for the actual script, and not necessarily the shooting sequence (since scenes may be shot out of sequence). The scene heading basically gives the location (within the script, not necessarily the filming location) where it takes place. It also consists of a prefix abbreviation telling whether it’s an interior (INT.) or exterior (EXT.) shot, and a suffix (optional, but sometimes useful) to give an idea of when the scene occurs chronologically (generally DAY, NIGHT, etc., but it can also include flashbacks, days later, moments later, later that day, etc.). The heading is always entered in capital letters. An example from the sample film template is: EXT.THE GREAT DITCH.DAY.
The next step is a combination of describing what happens (action) and dialogue by the characters. Basically, these two items are the guts of a script. And, they indeed work in tandem. Without action, all you have is basically a radio dramatization – if there is nothing visually of worth being presented to the viewer, you should probably just consider creating an audio podcast. Without dialogue, all you have is a silent movie – and nothing to put what the viewer sees into any context. Yes, there are exceptions to this (you may actually desire this), but generally both are essential.
Action is displayed in Celtx as a standard document or letter would be – normal indentations on left and right, with (in general) no special alignment or formatting. Action is a catch-all word for, well, everything visible on screen. This could include the direction a character is looking, something happening in the background, handling of equipment and/or props, and other events. It gives both the crew, cast and other personnel an idea of how you – the writer – visualize the scene as it plays out. You don’t require a 5,000 word essay, but you also should avoid being overly generalized (ie: “Alien leaves” doesn’t really say much; but “Alien turns on it’s tentacles and creeps through the entry hatch” conveys a more concrete image). Generally, an action should be described in between one and four sentences. Remember, you can (and actually should) always go back and edit the script – maybe a certain prop isn’t available; you may discover an actor simply can’t perform a certain movement; maybe you decided that a certain sound would (or wouldn’t) help the scene. Be bold! Be descriptive! The more information you can convey to the other personnel, the better understanding they’ll have of the limits they’ll be able to work with.
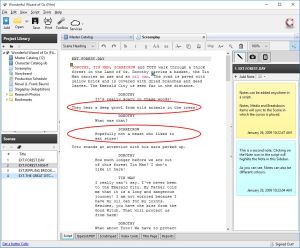
Celtx Sample Film Template – Action (top) and Dialog (bottom) circled
In the sample screenshot, the top red-circled item is an example of an action within the script. In this case, it reads “They hear a deep growl from wild animals in the trees!” So, the actors in this scene, from that point, should be ‘reacting’ to that sound. The sound engineer (or audio editor) will ensure that the sound is included at that point. Other personnel will have an idea of, for example, how the scene should be lit, what camera position(s) should be used, etc. All that from a simple action line. Yes, even the exclamation point serves a purpose.
Dialogue (Celtx displays this as Dialog) can be a monologue (the character basically talking to no one in particular, or possibly breaking the fourth wall and speaking to the viewers); a back-and-forth verbal exchange between characters; a group exchange (several characters around a conference table, or maybe a dining room table); the possibilities are endless. In a script, the character’s name is capitalized and centered on the page, followed by the actual dialogue that character will speak. To help anyone reading the script, dialogue is normally indented (left and right) roughly an inch to an inch and a half to separate it from Action entries. This is where much of a script’s length tends to come from, especially when there is banter back and forth from one character to another to another.
In the sample screenshot above, the bottom red-circled item is an example of dialogue. In this case, the character referenced is SCARECROW (centered, and all capitals). Directly beneath it is that character’s line:
Hopefully not a beast who likes to eat straw!
You should be able to see how that is indented much more than the actions. That is a standard format, which makes it easier to visually pick out different sections within a script. In that example, you’ll also see that it ends with an exclamation point – which should give the actor an idea of how to deliver (speak) the line.

Celtx Sample Film Template – Parenthetical circled
At this point, we’ll look at another section (actually, a sub-section under dialogue): the parenthetical. This can be selected by using the pull-down menu. It is placed immediately following a character’s name and their next piece of dialogue. The parenthetical is an instruction to both the director and the actor – indicating how the writer feels the line should be delivered (high-pitched, mumbled, etc.). However, the writer should be aware that they are not directing the film nor are they actually delivering the line. In other words, though it may add something to the dialogue – the principals involved will use such instructions as a starting point, and they may have a good reason to elaborate and/or eliminate it. Still, such items can be useful to convey something which otherwise couldn’t be easily written into the script. Remember – the writer (with few exceptions) is simply giving advice, and inviting the director and actor to participate in the creation of the film.
Such instructions should be kept to a minimum – both in length and in their use. If a parenthetical becomes three or more sentences, it may be better to incorporate it as an action section instead. Quite often, it’s merely a couple of words. In the screenshot example, the parenthetical merely reads (ashamed). This tells the actor their following line might best be delivered in such a manner. This might even extend to the actor’s mannerisms; in this case giving a ‘tail-between-their-legs’ look, possibly kicking aside an imaginary pebble. And let us not forget the director, who may feel that the line could be enhanced with some makeup to simulate blushing.
Also, overusing parentheticals could alienate the actor from the script. If it appears the writer is trying to control everything, any trust and bonds which had been present could disintegrate. Such overuse is referred to by the slang word wrylie (and various spellings) – where a writer feels that each line of dialogue requires a specific method of delivery. Again, there may be exceptions, but this is definitely something a writer should try to avoid. Ask yourself what a parenthetical actually adds to a production. If the answer is nothing except boosting the writer’s ego, then it probably should be omitted.
Transition is a post-production technique which is concerned with how two (or more) shots (or broadly, scenes) are combined visually using various film editing or video editing processes. Transitions in a script have slowly fallen out of favor. Unless there is an overwhelming need to have a fade-to-black, jump-cut, or other transition, such decisions are generally left to the director and/or editor.
Celtx does allow for entering transitions (again, via the pull-down menu). Such entries are all capitals, and right-justified. There are no examples in the sample film template, but I did include general transitions in my script – though these were limited to FADE-IN and FADE-OUT.
The final section (I’m going to omit text, since that’s rather self-explanatory) is shot. That one word can cover quite a lot of ground (figuratively and literally). Again, there is a fine balance between indicating a specific shot the writer believes would be best, and allowing the director to actually direct. One of the important things to remember is conveying an idea of what the overall scene should add to the film itself.
A shot could indicate how much of the scene is actually visible in the frame (field size). For example, if a character is arriving at a location then a long shot might be called for – a small image of the character on the distant horizon, slowly approaching and seeming to grow larger as they near the location. A character operating some huge machine might be captured with a medium shot – showing both the character and the machine in the frame. Or, a specific object may be the focus of the scene – a close-up of the object might work best. Keep in mind there is no specific definition of what the difference between, say, a long shot and a medium shot is – those are general terms intended to give an idea of what is intended to be shown.
A shot can also indicate the position and/or angle of the camera itself (camera placement). Maybe a body is lying on the ground; rather than showing it from ground level a better setting of the mood could be gained by using an aerial shot, viewing straight downward. Maybe a conversation between two characters is taking place; rather than showing both, a point of view shot shows only one character speaking toward the camera as if it were the other character. Such camera placement tends to be more clearly defined than field size.
There are several other terms associated with shots, and probably just as many interpretations of them. The important thing is that a shot should assist in ‘telling the story.’ A person (writer, director, or anyone else connected with a production) may think they’re the next Orson Welles (and such an attitude isn’t necessarily a bad thing). But attempting to use innovative or clever techniques, when such ideas don’t add anything to a project, is, to use the closing lines from The Bridge on the River Kwai:
OK. I was going to continue talking about other features in the program (storyboarding, etc.), but I will save that for a future post. As it is, this one is starting to get quite long. So, have fun until next time.
